Monday 31 October 2011

How to Make START menu option works faster

This is one of my favorite tweaks as it makes a huge difference to how fast your machine will 'feel'. What this tweak does is remove the slight delay between clicking on a menu and XP displaying the menu.

Go to Start then Run
Type 'Regedit' then click 'Ok'
Find "HKEY_CURRENT_USER\Control Panel\Desktop\"
Select "MenuShowDelay"
Right click and select "Modify'
Reduce the number to around "100"
This is the delay time before a menu is opened. You can set it to "0" but it can make windows really hard to use as menus will open if you just look at them - well move your mouse over them anyway. I tend to go for anywhere between 50-150 depending on my mood.

TURN ON UR PC IN JUST 10 SECONDS


Alright so u wanna know how to turn the pc on in 10 seconds(may vary).Here's what u have to do to turn ur pc on in 10 seconds

Click on the start button then press R it will take u to Run well go to run command, type Regedit ,Press enter
this will open Registery Editor.


Now look for the key

HKEY_LOACAL_MECHINE\SYSTEM\CurrentControlSet\Control\
ContentIndex

now there find the Key Called
"Startup Delay"
Double Click On It
Now where its Base
Click Decimal
Now its Default Value Is 4800000(75300:hexadecimal)
Change The Value To 40000
here u go u have done it
now close the Registery Editor and Restart Your Computer
You'll See The Result

Auslogics BoostSpeed 5.1.1.0 20111030

Auslogics BoostSpeed 5.1.1.0 20111030
DOWNLOAD Auslogics BoostSpeed 5.1.1.0 20111030

AusLogics BoostSpeed - the ideal solution to keep your PC running faster, cleaner and error-free. This powerful optimization suite will boost Internet connections, tweak Windows to its peak performance, clean registry and block annoying ads. It's a great way to keep your computer clean and optimized.

Speed Up PC With BoostSpeed
Modify Windows settings, file system and services to greatly increase system performance. Increase startup and shutdown speed, disable annoying CD autorun and error reporting features. BoostSpeed will keep monitoring your system for possible optimizations and let you know if such optimizations are possible. You can also run the System Optimization Wizard to periodically optimize your PC.

Speed Up Internet
Adjust your PC for faster images, music and software downloads, increased browsing speed and reliable Internet connections. View your download speed and graphs. To gain additional performance boost you can also turn on DNS Optimization.

Block Banner Advertisements
Tired of annoying banner advertisements accompanying many web sites? Now you can eliminate advertisements and also speed up your Internet browsing with BoostSpeed Banner Killer! You can add your own web sites to the black list to block them from showing their advertisements.

Keep Disk and Registry Clean
Get rid of junk on the disks and registry of your PC. Remove hazardous and space-wasting files left by untidy programs and crashes of your system. Dramatically increase the performance of your PC by cleaning, optimizing and defragmenting local disks and registry.

Optimize Memory and Appearance
Badly written applications constantly steal memory without giving it back. That's why your PC becomes unstable with time and you have to reboot. BoostSpeed automatically frees up computer memory to gain additional performance boost. You can also manually recover memory and clipboard.

Keep your PC fast and safe
BoostSpeed will detect most of the popular "PC-slowers" - bundle-software (such as eDonkey or Kazaa) which silently download malware and spyware to your computer, taking up internet traffic and slowing down the system. This will also keep your system safe from prying eyes of spyware programs.

Boost Software Products
BoostSpeed can improve performance of different software products, including Microsoft Office, Internet browsers (such as Internet Explorer, Opera, Mozzila), E-mail clients (Outlook, The Bat), MSN Messenger, ICQ, Media Player and others.

System Optimization Tools
Greatly increase your PC startup speed with Autorun Manager, where you can disable or remove the programs which try to load up when Windows starts up. Force-uninstall unwanted software products which take up space on your computer and slow it down.

Networks Tools
Keep your connection alive while you're away, synchronize your computer clock with atomic clock over the Internet, lookup domain names and IP addresses, measure your Internet connection speed. Troubleshoot and improve your Internet connection and local network with an excellent selection of network management tools.

DOWNLOAD:
FileSonic
http://www.filesonic.com/file/2749451855

MediaFire
http://adf.ly/3RMaZ

Sunday 30 October 2011

Send Fake Msg To Anyone

Now Send SmS To Any IndiaN
MobilE Number From Any
MOBILE Number (fully Hacked)
send sms
try and reply friends

Send Fake Msg To Anyone From Any No.

Hey frnd i hope u all are fine.Today iam bring a anonymous sms site..You only to do is to go to site www.sms2number.com.
1)In first box put yours no.(you can use anyone's no.)
2)In second box put the no. whom u want to send the msg
3)In third box just put the msg.

Thursday 27 October 2011

Norton Internet Security 2012 19.1.0.16

Norton Internet Security 2012 19.1.0.16

Norton Internet Security 2012 v. 19.1.0.16 [SW] | 119 MB
Genre: Anti-Virus

The Internet is a dangerous place, and cybercriminals are getting more creative in ways to target you and your invaluable personal information. Norton Internet Security 2012 and Norton AntiVirus 2012 provides our most powerful virus, spyware, online and PC protection so you can do more without interruption.
The latest upgrade of Norton Internet Security offers:
Our fastest performance ever
Industryleading protection
Easier to use Control Center and features
Key Features
Norton Protection System includes 4 layers of rocksolid protection designed to proactively protect against the very latest threats so you can do more on your PC without disruptions.
Customizable Control Center gives you the option to choose your preference between a simplified screen or the traditional detailed view.
Identity Safe alerts have moved to the Norton Toolbar so there are less interruptions while you are online but your passwords are still as secure as ever.
Bandwidth Management limits Nortons processes and updates when you have limited bandwidth or monthly downloads.
Download Insight 2.0 now tells you how stable a download is before you put your computer at risk for crashes or other bad things to happen.
Norton Recovery Tools help remove threats that can be deeply buried in a PCs operating system.
The Internet is a dangerous place, and cybercriminals are getting more creative in ways to target you and your invaluable personal information. Norton Internet Security 2012 and Norton AntiVirus 2012 provides our most powerful virus, spyware, online and PC protection so you can do more without interruption.
DOWNLOAD
http://www.filesonic.com/file/2747664025
http://www.filesonic.com/file/2747664035
OR
http://www.wupload.com/file/1202113556
http://www.wupload.com/file/1202113561

Nero Multimedia Suite 11.0.10700 (x32/x64)

Nero Multimedia Suite 11.0.10700 (x32/x64)

Nero Multimedia Suite v.11.0.10700 (x32/x64/ML/RUS) – Silent Installation | 630MB

Nero 11 enables a new way to create and share with others photos, music and video. You get a really high-grade tool that includes features simple and advanced video editing, video conversion innovative technology for watching movies on any device, as well as the possibility of burning and backup for all your needs for working with digital content.
The integrated Nero MediaBrowser
Thanks to a completely new Nero MediaBrowser can easily start working on any project. Most projects can be a one-touch access to a library of music, photos and video. Your work will become easier and more convenient, for now, just drag files to photos, videos and music from the library Nero Kwik Media in your project.
Convert and compress DVD-Video * and video
Whether it’s video, shot on your mobile phone, or DVD-Film, each device requires its own format playback. 11 Nero provides advanced video transcoding, which allow you to convert almost any DVD-movie or video to any video format for playback on any device, so you can easily view your favorite videos everywhere.
Project Importer Windows Live Movie Maker ™
Import and edit projects Windows Live Movie Maker directly in Nero 11. Open video files Open Windows Live Movie Maker, and immediately begin to improve the original design, adding new effects for professional results. Thanks to the advanced editing features you can add to your video professional touches.
Simple and advanced editing mode video
Get amazing results, regardless of their experience in video editing. You can easily switch from Express Storyboard editing mode in the advanced editing mode and continue working on the project in the same window. Go from the simple and easy to use templates to the effects of multi-track editing, management of key frames on a single screen video editing, a wonderful blend effects templates “Picture in Picture” and much more. Do your homework projects in sparkling delight friends and family like never before.
Nero LIVEBackup
Simple backups in one-touch by using Nero LIVEBackup to protect all your files and even whole operating system. You can choose to back up manually, but only Nero LIVEBackup provide continuous, reliable backup.
Burn multiple discs
The experts, who first implemented the technology to burn, constantly improving their decision. Exceptional app Nero SecurDisc 3.0 Scanning the surface of the disc ensure legibility, regardless of scratches, age and wear, so that your content will be stored for a long time to drive safe and sound.
Copy DVD
Move movies to DVD-ROM drive directly to the PC using one-touch copying. Put all your DVD movies and Blu-ray * into a single media library by copying them to optical media. Advanced settings allow to copy only what you need, eliminating unnecessary parts, tracks for other languages, additional materials and more.
Nero 11 empowers you to create and share your photos, music and videos like never before. The complete 360-degree experience offers easy-to-advanced video editing, innovative video file conversion technology for viewing movies on any device, plus burning and backup to support your complete digital life style.
Integrated Nero MediaBrowser
The all-new Nero MediaBrowser gives you a jump-start on projects. From most projects you can access your library of music, photos and videos with just one click. Drag-and-drop photos, videos or music files from Nero Kwik Media library into your project for a seamless and integrated experience.
Create photo books
Create lasting photo book, calendar and card memories with your family pictures in just seconds, and share with friends and family. No matter what the occasion, you can edit and create beautiful bound books, calendars and cards for gift-giving or for your own keepsakes. Best of all, you can showcase your beautiful pieces with professional printing, and have it delivered right to your door.
Convert DVD-Video * and video files
From videos on your mobile phone to DVD movies, every device seems to require a different playback format. 11 Nero provides advanced video transcoding that converts virtually any DVD-Video or video file to any video format for playback on any device so you can seamlessly watch your favorite videos anywhere or any place.
Import Windows Live Movie Maker ™ projects
Import and edit Windows Live Movie Maker projects directly within Nero 11. Open Windows Live Movie Maker video files directly, then immediately begin enhancing the original project with more effects for professional results, all within a seamless editing experience. Use Nero’s Advanced Editing features to give your videos the professional touch.
Easy and Advanced Video Editing Modes
Get amazing creative results no matter what level of video editing experience you have. Easily switch from express video editing storyboard to advanced multi-track editing with just one click, and seamlessly hand over the same project within the same window. Go from quick and easy template effects to multi-track editing, keyframe controls within the same video editing screen, amazing Picture-in-Picture effect overlay templates and more. Ramped up to give you the best output, your home video projects will impress your friends and family like never before.
Nero LIVEBackup
Take the hassles out of backing up with one-click Nero LIVEBackup for all your digital files and even your entire system. You can still choose manual backup, but only Nero LIVEBackup gives you continuous true peace of mind anytime, all the time.
Burn long lasting discs
Expect nothing less than the best with the experts who started burning. Exclusive Nero SecurDisc 3.0 with Surface Scan helps ensure disc readability regardless of scratches, age and deterioration so your content remains intact for a long time.
Ripping of DVDs
Move your movies from DVDs straight to your PC with one-click ripping. Put all your DVD and Blu-ray Disc movies * into one Media Library by ripping to your PC. Advanced settings let you rip exactly what you want-strip out unwanted sections, foreign languages, extras and more.
OS: Windows
Language: ML / RUS
DOWNLOAD
http://www.wupload.com/file/1201171316
http://www.wupload.com/file/1201171466

Monday 24 October 2011

Trick to Increase Mozilla Firefox speed


Many of you are getting bored with Mozilla Firefox slow speed.
But it's time to do something different to get rid of this. I Have 
founded a trick which will improve your Firefox speed and
load time. This trick is 100% working because I have used This
trick on my Firefox browser. Below are the steps to Perform this trick.

Instructions
1.)Open your Firefox browser and Type about:config in the
      address bar.
2.)Then look for the following entries, and make the changes
      as given below:
network.http.max-connections = 64
network.http.max-connections-per-server = 32
network.http.max-persistent-connections-per-proxy = 16
network.http.max-persistent-connections-per-server = 10
network.http.pipelining = true
network.http.pipelining.maxrequests = 200
network.http.request.max-start-delay = 0
network.http.proxy.pipelining = true
network.http.proxy.version = 1.0
3.)Now right-click anywhere and select New-Integer. Name it
      nglayout.initialpaint.delay and set its value to 0.
4.)You have done it enjoy the speed....!!!

How to find Product Key of Windows Xp Bootable cd


Hey guyss if you want to install Windows xp in your pc and by chance 
you have lost the Product Key than don't be panic.Here in this post 
i am going to tell you how to find the Product Key of xp bootable cd.
To do this just follow the instructions given below.


Instructions
1.First of all open the xp bootable cd.
2.Open folder named I386.
3.Find the text file named as UNATTEND.
4.Open it in notepad and scroll down to end.
5.There you will find your Product Key.

How to create an autorun file for my Software CD?


Hi,guys if you want that when you insert any software CD in your 
cd drive than the setup of the software should start automatically.
For this you have to create an autorun file for the cd.Steps are 
given below to do this.

Instructions:
1.First of all open notepad and write:
    [autorun]
    OPEN=Setup_filename.EXE
    ICON=Setup_filename.EXE
2.But remember to replace "Setup_filename.EXE" with the name 
    of setup file of the software.
3.Now save the file with the name "autorun.inf".
4.Burn your software cd with the autorun file.
5.Now when you insert the cd the setup will automatically start.If
    the setup does not start than goto My Computer and double click on 
    the cd.

Direct call to CC

Hi friend by using this trick you can call direct to customer care...just dial 198p1p1p2 and your will go directly to cc

Airtel free game download

Here enjoy free airtel games,just go to the below url and it will allow you to download it http://202.46.201.112/ar3/dec08/sport/vg.jst?cost=0 & gname=[add any game name]ENJOY

Facebook Trick:How to Flip the text of your status or comment


Hello,guys today i am going to share an amazing trick by which you
can flip text and you can use it as a Facebook comment or status.By 
this trick you can easily amaze your friends.Steps are given below
by which you can perform this trick.


Instructions
1.First of all go to fliptext.org.
2.Just type your text in the box and click on Flip Text button.
3.Now the text that you have written is flipped.


4.Simply copy the text and use it on Facebook as a comment or status

410 msgs At rs 9 New Trick

Airtel provides only 400 msgs on 5rs SMS pack
that too a validity of only 1 day.........


But u can get 410 msgs by simply followings the simple steps that too with a validity of 30 days......

so heres the step:-

Buy a 10rs recharge, on it u will be getting Rs 6 talktime and plus 10 msgs with a validity of 30 days check ur sms balance by dialing *123*3# it will be showing 10 msgs with a validity of 30 days

3)Dial *222# for 5rs sms in which u will be getting 400 sms for only 1 day but not toworry these
400 msgs will be added with ur 10 msgs which u were given on 10rs recharge.........


4)After subscribing with 5rs sms pack u will get a msg from Airtel that ur msg pack has been activated and blah blah...........

5)Now dial *123*3# ur message balance will be 410 msgs with a validity of 30 days.........! its work 100% working checkd by me.. if u like then hit thanx ya repute me..
NOTE:- if i hlpd u then dont 4rgt to visit my site again.enjoy.

Now Optimize Your Windows PC for Free


Here are a few practical tips for improving your computer's performance by using stock Windows utilities and a few programs you can download for free. Though the associated articles assume that you're running the latest version of Windows 7, many of them work just as well on older copies of Windows 7, Windows Vista, and even Windows XP. None of the optimization tips and tricks in this guide cost anything, so feel free to run them as often as you'd like to ensure that your computer runs lean and mean for as long as possible.

Of course the first step in optimizing your PC's performance is to figure out which programs are running and how heavily they're taxing your hardware at any given moment. Thankfully, Windows 7 comes with a slew of free utilities that you can use to pinpoint performance bottlenecks and uncover weak points like outdated driver software or missing Windows security patches. Uninstall unwanted programs and download the latest versions of your device drivers from the manufacturer's website to ensure that your hardware will deliver peak performance.

Windows Task Manager 

Use free tools like Task Manager to monitor your PC.You should also keep an eye on your Windows Resource Monitor to confirm that your PC is running only the programs you need. You can temporarily shut down unwanted programs by using the free Windows Task Manager, but consult our detailed guide on how to use Task Manager to avoid accidentally shutting down system-critical programs. It's always a good idea to delete unwanted programs to maximize space, but many useful programs that you rarely use automatically start system-hogging processes, potentially bogging down your PC's performance. To minimize this problem, take advantage of free Windows utilities like MSConfig to disable Windows startup programs that you don't use every day.

Last, keep track of how efficiently your PC sends and receives data online. With the advent of broadband data caps, monitoring the amount of bandwidth your PC uses is more important than ever. You can find lots of great free utilities to help you stay on top of how much data you're exchanging, and we explain how to monitor your bandwidth using one of our favorites tools, BitMeter OS. BitMeter OS runs silently in the background while you surf the Web, gathering detailed records on how much information you upload and download, without paying attention to the content. Use it alongside the other free utilities mentioned here to wrangle peak performance from your PC.

BitMeter OS 

Free tools like BitMeter OS help you stay on top of your PC's performance

Devil's Eye

I will show you how to go from this

into this


 Well first off you need an eye to work on(get a big and high resolutioned one). Or you can grab this one.

First duplicate the eye layer(and work on the
duplicated one so you can toogle back and forth later, and see the changes),to do this go to your "layer/channels/paths" window,right click the word background and chose "duplicate layer". I marked the window with red.
Then select the burn tool and set it's range to midtones
and exposer to 35%(the burn tool is labeled 1 and its options are circled), 
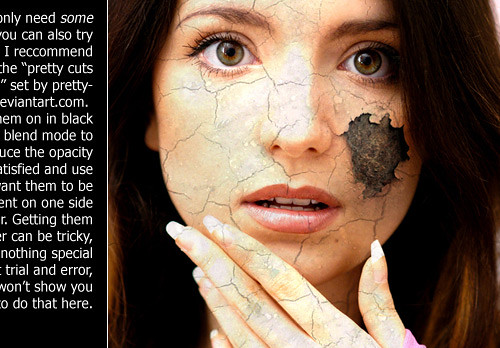
then burn all around the edges of the iris(the start of the eye, the colored part not the white part) till it's almost black but not quite black,then increase the size of the brush and burn the
pupil(the black part of the eye)

it should resemble this now.
Then use the burn tool around the
whole eye(right on the eyelash line) and apply it like eyeshadow till
it starts to look heavy and dark,
like this,

Then grab the dodge tool set its range to midtones and its exposer to 35%(this is the same place the burn tool is located,just right click the burn tool icon and click on the dodge tool or you can hold down the ALT key while you burn and instead of burning it will dodge) and go inside/inbetween of the iris and pupil and make it glow.

Now create a new layer(to do this go to your "layers/channels/paths" window and click on the icon I circled
and set the blending mode to color(to do this you make sure that the new layer is active or highlighted blue, and at the top of the layers channel you'll see a box with an arrow pointing down and inside
the box it will read "normal" click on it and a list of options will come up, change "normal" to "color"(is it all the way towards the bottom) click it, and reduce the opacity(it is located at the right of the box you just changed) of that layer to 50%, now get a nice bright
color(on your tools just double click on the top color box),now click the paintbrush tool make the mode of brush normal and set the opacity of it(the brush) to 100 and the flow to 100 and choose a brush size so that it fits inbetweeen the iris and the pupil(and keep all the sizes of the brush to a rather soft edge)and paint inside of it(I chose an orange/yellowish color).

Now click on to your "background copy" layer again and select your dodge tool again and go right around the edge of the pupil(with a very small brush) a few times.
To get this,

Then increase the brush size and go all around and inbetween the iris and pupil where you colored.

With the "background copy" layer still active, go to
"filter-render-lighting effects" and click it,you'll see a diagram of your eye,now make the light come from the top of your eye(this is the only way I can explain it,you'll see an oval with four little squares and it will have a mouth like pacman)(LOL),the mouth of pacman is the focal point of light,put the mouth/slit above the top of the eye or any direction you think it looks best,now for the rest of the diagram,(lots of stuff huh?) well don't let it all scare ya(we will be out of this window in a jiff), you'll see two boxes to the right, pick the top one and change the color to a dark/pale looking color(I chose a dull orange)and hit ok.
This is the reaction

Now your eye should look pretty creepy about now, but if it looks to colorful you can try this: with your background copy layer still active go to "create new fill or adjustment layer" I circled it here

(that is located right under
your background and layers pallet and looks like a "ying yang" sort of, it is a circle that is halved and is black on one side and white on the other), click it and go to hue/saturation and click that,now go to the saturate and decrease it till you have a more likable product and hit
ok.
You should have something like this now.

Now go to your color layer and make it active(highlighted blue),with it active hover your hand/arrow over the square(the little picture of your color layer) and hold the control button down and click it(you'll see in the main picture(the big one)that the color you have painted in is now selected with the little ants(the little moving things that make you know that you have selected something), now as before click on "create new fill or adjustment layer" then click on the brightness/contrast one,increase the contrast some and decrease the brightness some till you get something you like and click ok. I kinda liked this option. :)

Now if you don't like the color you can change it,just hover your hand/arrow over the color layer you made and control click it again(you will see the ants dancing again on the main picture),and go to the "create fill or adjustment layer" then go to hue/saturation and use your hue slider bar till you get your prefered color and click ok. And there you have it an evil eye! Sorry for all the long drawn out explaining but it may be necessary for some people(I know I could have used it in some of the tutorials I've tried). This tutorial is aimed at the begginer(like myself) so they can more fully comprehend and understand. (P.S. if you have any questions just ask and I will try to explain it some more).

Crack and Peel


Age Progression - Photoshop Tutorials

Here’s a little tutorial showing you how I basically go about aging a woman’s face in Photoshop.
Preface
I've been asked several times by different members to post a tutorial on how I age-progress a person. So, here it is!


Men and women age a little bit differently but since I've only aged female celebrities thus far, I'll just focus on women for this tutorial. I’ll be using the image of Katie Holmes that I did for a past W1K contest, as an example.

Step 1: Choosing an Appropriate Photo
When deciding to age-progress a celebrity’s face, I try to select a picture that is touched-up as little as possible.


I find that candid shots, or any shots that have not been taken in a studio, work best because the resulting harsh lighting reveals more of the skin’s details i.e. slight bags under the eyes and faint wrinkles. The appearance of such details makes it all that much easier to visualize how your subject will age. Visualizing what the end result will look like brings you one step closer to aging her face realistically.


In Katie’s case, we can see very faint horizontal lines on her forehead, fairly obvious lines under her eyes and lines bracketing her mouth.

Step 2: Collecting Reference Material
Reference material is key in my method of aging. Keeping Katie’s face in mind, I scoured the Web, looking for faces of old women who either resemble Katie and/or share the same facial expression. Here, Katie is smiling with her face positioned at a 3/4 angle so I tried to gather as many pictures of old women who are smiling in the same manner or close to that. I then opened up the picture of Katie in Photoshop and pasted the found images around her face on a separate layer, spread out to provide easy visual access.


Another kind of reference I like to use but is usually hard to find, is pictures of the subject’s parents. I managed to find a couple of reference pictures of Katie’s mother online and they really helped me to decide whether or not to give Katie a double chin. Since her mom has quite a bit of mass under her chin, I decided I would apply that to Katie too.

Step 3: Thinning Brows
Now the fun begins! The first thing I like to do is to thin out the subject’s eyebrows and eyelashes. The older people get, the thinner their hair gets - either because hair falls out and/or because it dries out as it greys.


So to achieve this, I like to use the Clone Stamp tool at 100% with a relatively small brush size depending on the size and resolution of the image. I sampled the surrounding skin to thin and reduce the number of hairs.

Step 4: Mold the Face
Next, I like to add the basic sags to the skin. I do this in the Liquify mode. I tried to create sagging effects to the cheeks, jowls and the cliff just above the eyes by using the Push tool. For the eyes, I tried to be subtle; otherwise she may end up looking somewhat ghoulish.


From what I’ve learned about the aging process, I know that while bones cease to grow, and in fact shrink, cartilage does continue to grow. As a result, the end of a nose may appear larger as a person grows older. So while I was still in the Liquify mode, I used the Push tool to extend the length of the nose slightly. Then I used the Bloat tool to also enlarge it slightly, being careful not lose the essential quality or character of the nose. Go too far and it may not look like Katie anymore.

Step 5: The Aforementioned Double Chin


Based on her mother’s pictures, I then added a fairly massive double chin. I initially used the Airbrush tool with some fairly broad strokes, sampling the colors that were already in the area of her neck. I then worked in the details with a finer brush size. Also, keep in mind that I was also using the other reference photos of older women to guide me.

Step 6: Wrinkle Up the Eyes
For me, the most important parts to get right are the eyes. They can make or break the project. Done wrong and the picture may no longer be identifiable as one of Katie Holmes anymore. I sought out the fine lines around the eyes and I tried to imagine how they would progress into wrinkles. I then extended them in length and width accordingly. Referencing the pictures of old women helped a lot with this step.


I used a combination of the Stamp tool and Brush tool. I wish I could explain my technique at this point in a more clinical manner but mostly I relied on my artistic instincts. I emphasized the wrinkles around the eyes by widening and deepening the lines slightly and increasing the contrast by darkening the recesses and lightening the edges. Also, I extended wrinkles to the cheekbone areas. I then applied the same technique to the wrinkles around the mouth and to the forehead.

Step 6: Reducing the Lips
In this step, I work on the lips. As people grow older, the outline of the lips tends to recede. Using the Stamp tool, I sampled the skin surrounding the lips and thinned them out.


While I was at it, I also added a few vertical wrinkles above the lips to give her a bit of a "prune" effect. We just want a hint of that, so don’t carve out deep lines; deep lines would only be necessary if she was puckering her lips.

Step 7: Planning Out More Wrinkles


Here, on a separate layer, I faintly outlined or sketched, with a relatively thin brush size, areas that I may or may not add more lines and wrinkles to. It’s easy to get carried away with the addition of wrinkles. So, I stopped, took a step back and assessed where to take to image. For me, it's essential and a great test to see what best works.

Step 8: Touching Up the Wrinkles
Based on the previous step, I added wrinkles where I thought they were needed most.


Overall, I found that the wrinkles and lines seemed a little flat in comparison to the rest of Katie’s features. They needed more definition so that they could pop out more. So, I highlighted the raised edges of the individual lines with the Brush tool and with a lighter skin tone.

Step 9: Hairy Lips
Facial hair becomes an issue with most women as they age. For some strange reason they lose it in the brow area and grow it back around the mouth area. I didn’t want Katie to be the exception so with a very fine brush size and the Brush tool, I added hairs to her upper lip.


I tried to make it as subtle as possible. Hairs too thick or dark would draw the viewer’s attention straight to her mustache and I didn’t want that. I also added more wrinkles to the area below the corners of her mouth.

Step 10: Refining the Neck


I decided that the neck was too smooth for a woman of 75 years of age. So I added finer wrinkles to that area. Also, I added more mass and weight to her jowls with the airbrush by increasing the value of the tones in those areas thus creating more contrast between surface planes.

Step 11: Adding Age Spots
A key component to effective aging of a face is the addition of age spots.


So at this point, I sampled one of the darker skin tones on her face, and on a separate layer that was set to Multiply and 30% opacity, I brushed them in and tried to create irregular shapes (there IS no perfect age spot). You can add as many as you like; the amount varies from person to person. I decided to be conservative with Katie.

Step 12: More Refinements
I took a little break from it and came back to it later to possibly get a better perspective on it. When I looked at it, at this point, I decided that certain areas needed refining and added detail. This is the beauty of working with a high-resolution file; I can zoom in real close and deal with a wrinkle up-close and personal.


Unless their teeth were subjected to regular whitening, most people’s teeth yellow with age. Gums also recede, showing less gum and more bone. And so with that in mind, I sampled a yellowish-brown color and on a new layer that was set to Multiply and 30% opacity and painted that color to the teeth with the Brush tool. Her gums didn’t show to begin with, so receding the gums here wasn’t necessary.

Step 13: Preparing the Hair


The finishing touch here is greying the hair. I began by creating a mask defining the area of the hair. I used the brush for this and tried my best to define as many loose strands of hair that I could.


With this mask as a selection, I then created a Hue/Saturation adjustment layer and reduced the saturation to –63.


I then created a new adjustment layer based on the same mask and adjusted the Brightness/Contrast to brightness +9 and contrast –36. As a result, I found that the darker areas were too pale and caused a loss of depth and so to adjust that, I then selected the mask and scratched out the darker areas with a 5px brush size at 50% opacity so that they could show through from the original image.

Step 14: Hair Raising
The next step was to raise the hairline and thin out the hair. Hair loss is common with both sexes.


I sampled the area at the top of the forehead and extended the skin area above the original hairline.

Step 15: Greying the Hair
A lot of details of the hair were lost in the previous step so with a thin brush size at 80 percent opacity I drew in fine grey hairs, sparsely laid out.


Patiently, slowly, stroke by stroke I added more and more hairs until I was happy with the amount of grey I had added.

Step 16: Finishing Touches
Finally, I took a step back, refined a few wrinkles here and there ET VOILA!


I hope this tutorial was insightful. It may not be the most technically detailed tutorial but it gives you a good idea of the process I go through to get the job done. Hopefully, it will help you create your own trophy-winning images for future Fountain of Age contests!